Between the thirteen charted Sectors included in WCRPG, there are plenty of locales available for a GM to hammer out an adventure. Sometimes, however, a GM may want their adventure to take place in a Sector that doesn't already exist; they might be introducing a new species, or perhaps setting their adventure in an area of unknown space inhabited by a canonical race such as the Hari or Nephilim. They may simply want to set up a bare-bones adventure or campaign in the style of Armada. For those adventures, a whole new Sector map may be required. Fortunately, the procedure for creating an Akwende Projection (the type of interstellar navigational map utilized in the Wing Commander Universe) is not particularly difficult.
If a designer is creating a whole Sector from scratch and wants to fill in all the details they can at the time of its creation, the process of star system creation will have to take place many times over (whether they are creating full star systems or simple Privateer-style nav maps). It may be that the designer does not want to have to do all that work by hand; fortunately for the aspiring Sector creator, there are freeware programs on the Internet that create satisfactory star systems with realistic planetary physics. Going this route is fine and dandy, though care should be taken that the resultant planetary and stellar characteristics approach what is normal for the Wing Commander Universe. The procedures listed in this sub-Chapter as well as the following two sub-Chapters create such characteristics and can be used as a guide for determining what is "normal".
Sectors in the Wing Commander Universe contain three main things: stars, nebulae, and jump tunnels. A reasonably sized Sector will have between 40 and 80 stars (60 on average), with an average of 2-3 jump tunnels connecting each system (though there is theoretically no maximum number). All systems need to have at least one jump tunnel (even if it leads back to the same system). A Sector should have no more than four nebulae (one per Quadrant, with no nebulae in the vast majority of Sectors) affecting no more than five systems (two on average). A designer can add any additional feature to a Sector they wish and are not limited to the numbers listed above (though going higher than them tends to crowd Sectors a lot faster than one might think). Regardless of how it's done, creating a Sector is a lot of work and can be vastly rewarding.
The procedure for creating a Sector from scratch is as follows:
- Determine the number of systems per quadrant.
- Place the systems.
- Determine the number of jump points in each system.
- Place all the indicated jump tunnels.
- Add any additional "finishing touches".
Bear in mind that the procedure assumes the Sector designer will be making die rolls to conduct the majority of the necessary decisions in the procedure. They may choose to forgo these rolls and select a result of their liking at their discretion, provided that the decision made would be a valid result of the prescribed die roll. Also, the procedure as listed assumes that the designer is making use of the Sector Record Sheet available in Appendix Two.
Determine the number of systems per quadrant
The first step in creating a new Sector is to determine the number of star systems that will be present in each of its four quadrants. To do this, the creator selects one of the four Quadrants at their discretion and makes a 2d10 roll, adding six to the result; the result of the roll sets the number of systems that will be located in the Quadrant. The creator then simply repeats this die roll for each Quadrant in turn until they have a result for all four Quadrants.
Once the creator has a number of systems for all four Quadrants, they will need to make a d% roll for each quadrant in turn to determine whether or not it will contain a nebula. If the result of the die roll is 10 or less, a nebula will be present. In that event, the creator will make an additional 1d5 roll; the result of this roll indicates the number of star systems that need to be located within the nebula.
Creating a Sector from scratch is a fairly straight-forward process. Nevertheless, there may be those out there who could use a little bit of help. For those folks, an example of each step will be provided after it has been explained. A quick note: all of the examples involve a creator that has already selected names for all of the contents of their Sector, including system and Quadrant names. This is neither required nor expected for the vast majority of cases at the onset of the Sector creation process, though everything should be named before the Sector can be called complete (as noted at the end of this procedure).
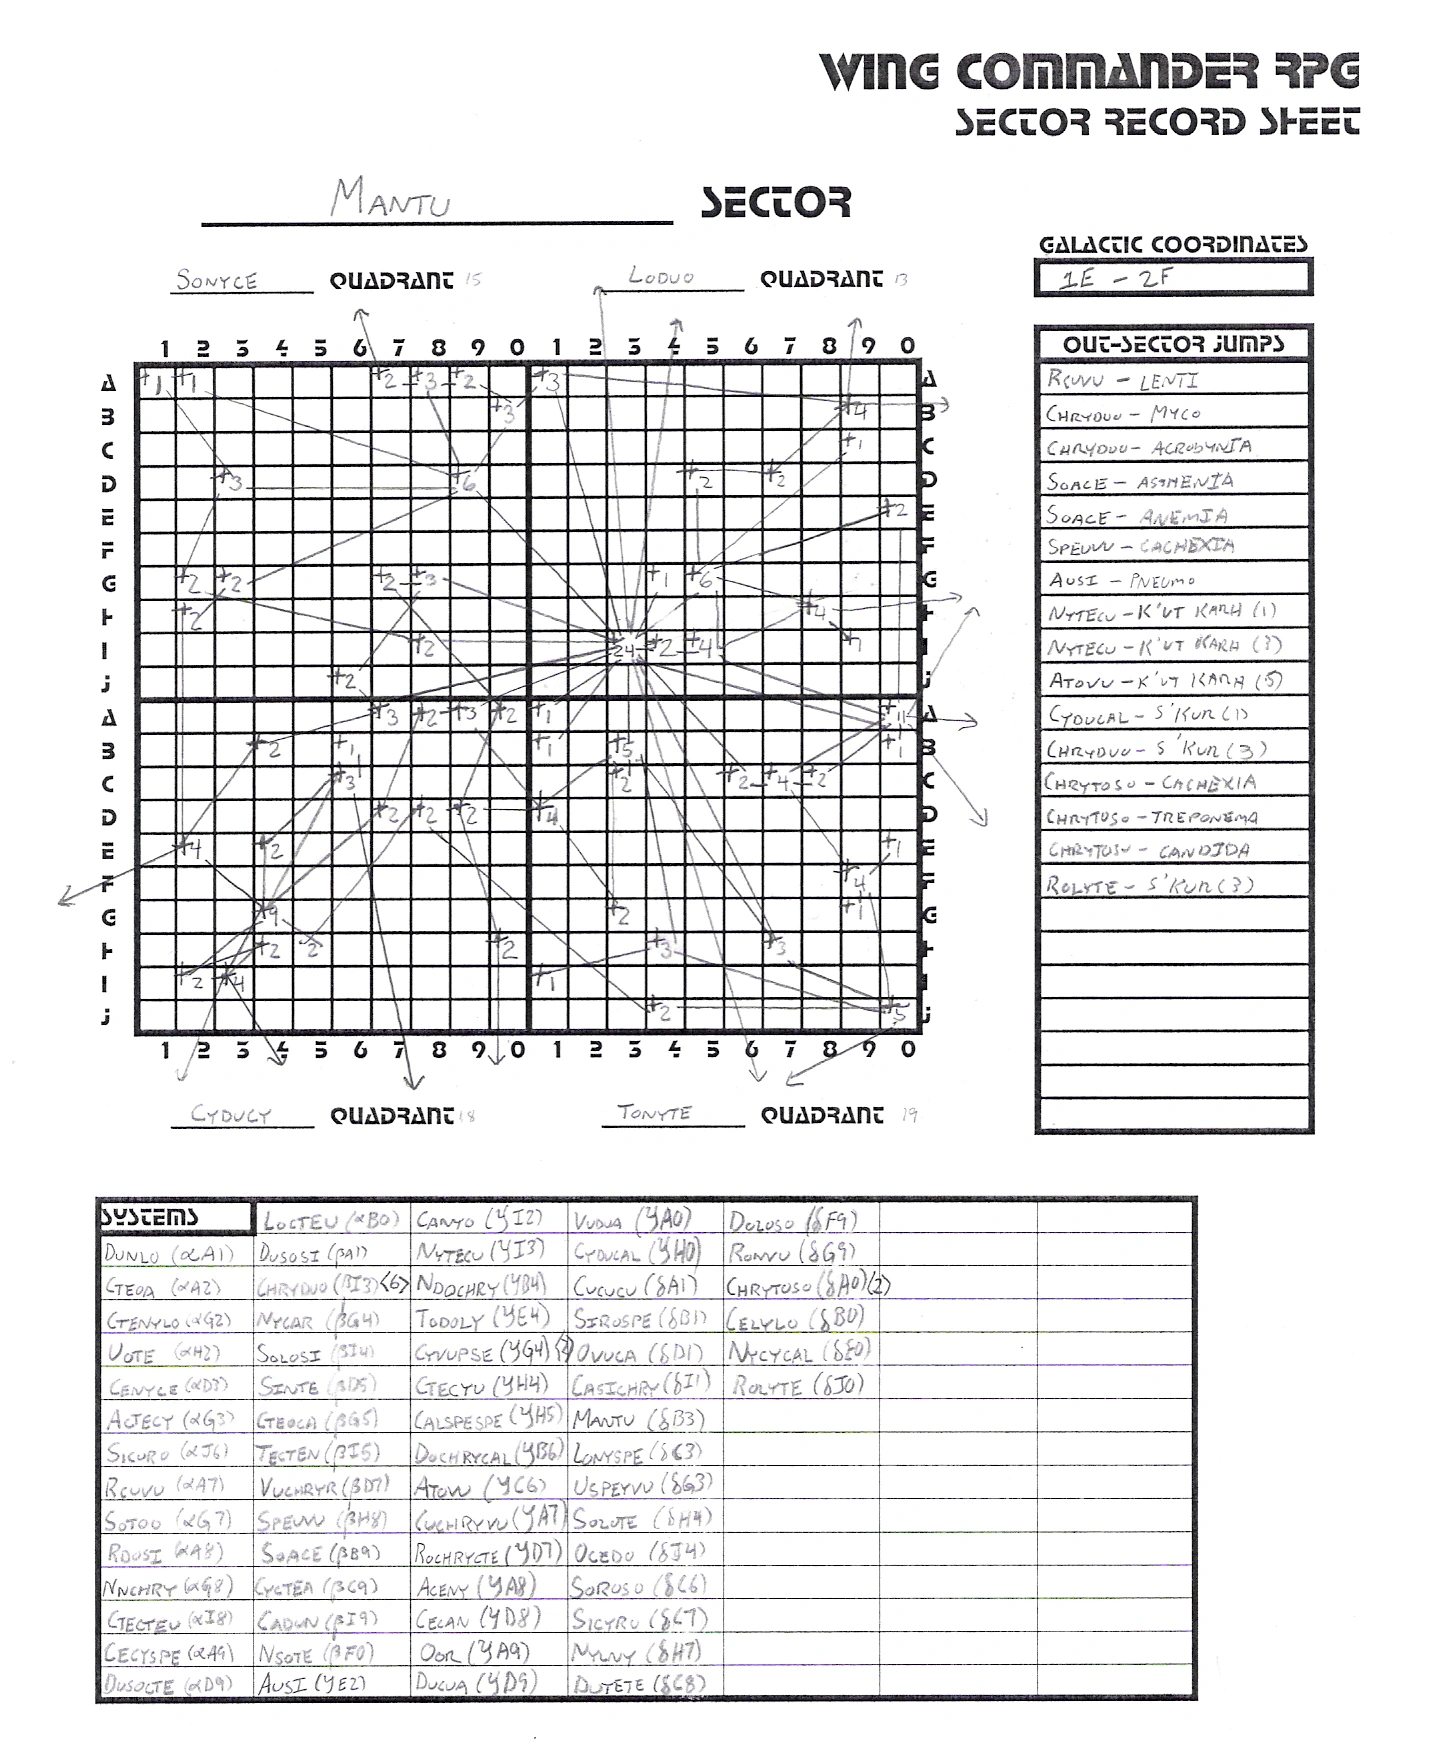
Our creator has decided to create the Mantu Sector for a campaign involving that enigmatic race. After printing off a clean Sector Record Sheet, they make four 2d10+6 rolls to determine the number of systems in each Quadrant, deciding to set the upper left Quadrant first, then upper right, then lower left, and finally lower right. The rolls result as 15, 13, 18 and 19. Thus, there will be fifteen systems in the upper left Quadrant (which they've named "Sonyce"), thirteen systems in the upper right Quadrant ("Loduo"), eighteen in the lower left ("Cyducy") and nineteen in the lower right ("Tonyte"). The creator makes note of these numbers on the Record Sheet.
Next, the creator makes four d% rolls to see if there will be any nebulae in the Mantu Sector. The results are 87, 61, 99 and 08. The last of these results is less than ten, so the Tonyte Quadrant will contain a nebula. The creator makes the additional 1d5 roll; a four results, so they make note to put four of the systems in that Sector within a nebula later on in the creation process.
Place the systems
Once a creator has determined if any of the systems in their Sector will be affected by a nebula, the next step is to place the indicated number of systems within each quadrant. Quadrants are represented as a square area on an Akwende projection (despite the fact that all Sectors and Quadrants are technically trapezoidal annular arcs in nature; remember that Akwende projections are simple tools for navigation and have no bearing on the absolute distance between star systems). Each Quadrant is essentially a ten-by-ten square grid; the lines along that grid are present simply for ease of setting system positions. Each square on the grid has a set of coordinates, which are listed as a numeric horizontal coordinate (1-0) by an alphanumeric vertical coordinate (A-J), with 0J located in the lower right-hand corner of the Quadrant. This coordinate set allows a Sector creator to use a d% roll to determine the system's coordinates on the projection.
For each system indicated in the Quadrant, the Sector creator will roll d% to set its position. The d10x10 will set the system's horizontal position in the quadrant (with a result of 10 = 1, 20 = 2, etc.), and the d10 will set its vertical position (with 1 = A, 2 = B, etc.). The creator will need to map the positions of the systems on the Sector Record Sheet as they make rolls. In the event that a system's indicated position within a Quadrant duplicates that of another system, the creator may either re-roll its position or simply not include it; all systems must have their own unique set of coordinates.
Once the creator has set the positions of all the systems within a Quadrant, they simply need to repeat the procedure for the remaining Quadrants until the position of every system in the Sector has been established. At this point, the creator may select which system will be their "Sector Star", which will share the name of the Sector when the creator finally gives it a name (for example, there is the Gemini system in the Gemini Sector, the Sol system in the Sol Sector, the Kilrah system in the Kilrah Sector, and the Landreich system in the Landreich Sector).
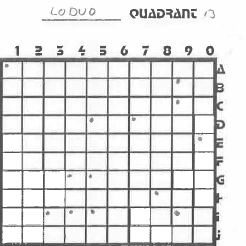
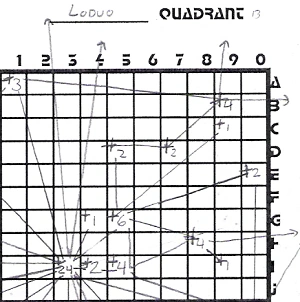
Initial placement of stars in the Loduo Quadrant.
It would be a bit impractical to show our creator finding the coordinates for every star system in their Sector (it has sixty-five systems in it), but an example can easily be provided for a single Quadrant.
Our creator is far enough along in the process to begin making die rolls for system placement. They begin rolling for the Loduo Quadrant (again, this is the one in the upper right-hand corner); this Quadrant had 13 star systems in it, so the creator will roll thirteen times and place systems as they go. The first roll comes up as 57, so our creator will place a small mark in column 5 and row G (the seventh row from the top). The next roll comes up as 49, so they place another mark at coordinates 4I in the quadrant. The remaining rolls are 54, 93, 74, 88, 05, 49, 39, 10, 59, 99, and 47. Note that 49 was rolled twice (this indicates 4I). The creator wants to keep that system, so they roll again. It comes up as 93, another duplicate; another re-roll is made, which comes up as 92 and allows the creator to place the final system.
Once all the systems are placed in the Sector, the creator takes the time to note their positions in the Systems area of the Sector Record Sheet and to give each of them a name. They elect to place the Sector Star (i.e. the Mantu system) at 3B in the Tonyte Quadrant.
Determine the number of jump points in each system
Once their coordinates have been determined, the next step is to determine how many jump points exist in each individual system. This number includes any in-system jumps or jump lines that connect back to the same system, both of which require a minimum of two jump points within the system). To determine the number of jump points present in a system, the creator will roll d% for every system in the Sector in turn and compare the results of the rolls to the following table:
| d% Result | Number of Jump Points in the System |
|---|---|
| 00-26 | One |
| 27-66 | Two |
| 67-79 | Three |
| 80-89 | Four |
| 90-92 | Five |
| 93-95 | Six |
| 96 | Seven |
| 97 | Eight |
| 98 | Nine |
| 99 | Ten |
If the result of the roll for a given system is 96 or higher, the creator may (if they so choose) roll again, adding the resultant number of jumps from the subsequent roll to the number indicated by the first roll. Should the second roll or any subsequent roll result as 96 or higher, the creator may continue adding to the sum of the previous results until a result less than 96 results. The tally at that time represents the final number of jump points present in the system. Note that very large numbers of jump points will make a star system particularly crowded when it comes time to map it.
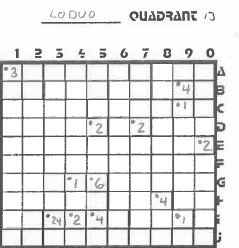
The Loduo Quadrant, with the number of jump points indicated for each system.
From the picture in the previous example step, it's obvious what our creator's thought process is; they placed a mark to denote the presence of a star system. As they continue with the procedure, they will fill in the number of jump points in each system and finally change their mark when all the jump points in each given system have been accounted for. This is an effective way of building a Sector and limits the need for an extra sheet of notes as the building process continues.
With the positions of the Sector's systems determined, the creator turns their attention to the number of jump points in each system, beginning with the Loduo Quadrant. They decide to go through it in a "zigzag" pattern (from right to left then left to right and from top to bottom throughout the Quadrant), noting the resultant number of jumps as they go. Their first roll comes up as 73; the system at 1A (which they've named "Dusosi") will have three jump points in it. They continue to roll for the remaining systems in the Quadrant: the results are 80, 22, 62, 32, 62, 94, 16, 85, 20, 84, 37, and 99. The final roll in the series (corresponding to the system at 3I, which they've named "Chryduo") indicates ten jumps and is a result of 96 or higher, so they roll again for that system. The dice come up as 99 again, adding another ten jumps and inviting yet another re-roll; an 82 is the result of the next roll, indicating another four jumps. This means that the Chryduo system will have a whopping total of twenty-four jump points within it.
Place all the indicated jump tunnels
With the number of jump points in each system determined, it's time for the creator to build the Sector's jump tunnels. They simply need to play a quick game of "connect the dots" on their Sector Record Sheet, keeping careful track of the number of jump points that are in each system and the number of tunnels they've connected already.
While there are no formal rules for determining how to place jump tunnels, Sector creators are encouraged to use the following guidelines:
- Systems with only one jump point should be connected first, followed by those with the largest number of jump points. This should be followed by systems with decreasing numbers of jump points. This serves to simplify the entire process.
- A few jump points in systems close to the "edges" of the Sector should be reserved for "out-Sector jumps" in order to make it accessible to adjacent Sectors. Similarly, some jump points in systems near to the edges of a Quadrant should connect to systems in adjacent Quadrants.
- Pairs of jump points may be reserved for "in-system" jumps; these should in general be reserved for systems with a relatively large number of jump points. Where an in-system jump exists, it should be so noted on the Sector Record Sheet.
- Jump tunnels may "cross" one another on an Akwende Projection, but they all must terminate at the first system with which they come in contact (i.e. a jump tunnel may not "skip over" any systems in their path).
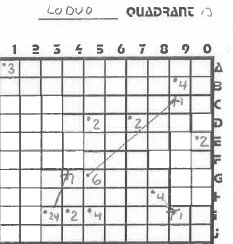
Initial placement of single jump tunnels.
This step doesn't lend itself well to an example, unfortunately, due to its arbitrary nature. Sufficed to say, the creator went through each Quadrant to set the jump tunnels for systems with single jump points first. They then went to the Chryduo system (which had more jump points than any other system in the Sector) and set the jump tunnels leading there, reserving six of its jump points for in-system jumps. They then went through the systems with progressively fewer jump points, ending with those systems with two jump points.
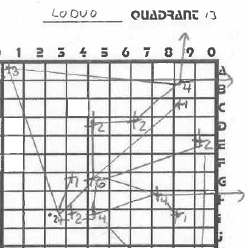
The assignment of jump tunnels a little further along.
As they proceeded with placing the tunnels, they marked off "completed" systems by changing their initial dot to a plus sign. They also selected certain jump points in edge systems to lead to adjacent Sectors and noted the names of the systems to which the corresponding jump tunnels connected in those adjacent Sectors (they had to make the names up in each case along all but the bottom edge of the Sector; since the bottom edge was placed adjacent to the Vukar Tag Sector, they already had those names available). The end result of their work can be seen at the end of this sub-Chapter.
Add any additional "finishing touches"
Once all jump tunnels are in place, the Sector is basically complete. There are a few final steps a creator may perform at this point. If they haven't done so already, they may select a system to house the sector's "Capital", a planet or base that handles local interstellar government within the Sector (in Gemini, this is New Constantinople; it's Janus IV for the Tri-System, etc.). The determination of the Sector's Galactic coordinates may also be set at this point if the designer so chooses. Systems, Quadrants, and the Sector itself should be named at this point if the creator hasn't done so already. Finally, the creator should consider the number and types of bases that will be present within the Sector; this may involve creating nav maps or full-on system maps of each individual system, depending on the level of detail the creator desires.
The finished Loduo Quadrant.
Our Sector creator has been good about naming things as they go, so there's not a whole lot of additional information they need to add at this point. They go ahead and set the Sector's galactic coordinates from 1E to 2F in the Galactic Alpha Quadrant; this puts it immediately coreward of the Vukar Tag Sector (which, as previously noted, was their intent).
Finally, they decide to begin filling in details about certain systems in the Sector; amongst them is an insignificant system located at 3I in the Cyducy Quadrant, named "Cyvuspe". They intend for this system to play a significant role in an upcoming campaign and so they need more details on it. Filling in those details is beyond the scope of this procedure, but is covered by some of the other procedures in this rulebook and will be used as an ongoing example. See Chapter 10.2.2 and Chapter 10.2.3 to continue this example to the next level of detail.
The Mantu Sector: An Example
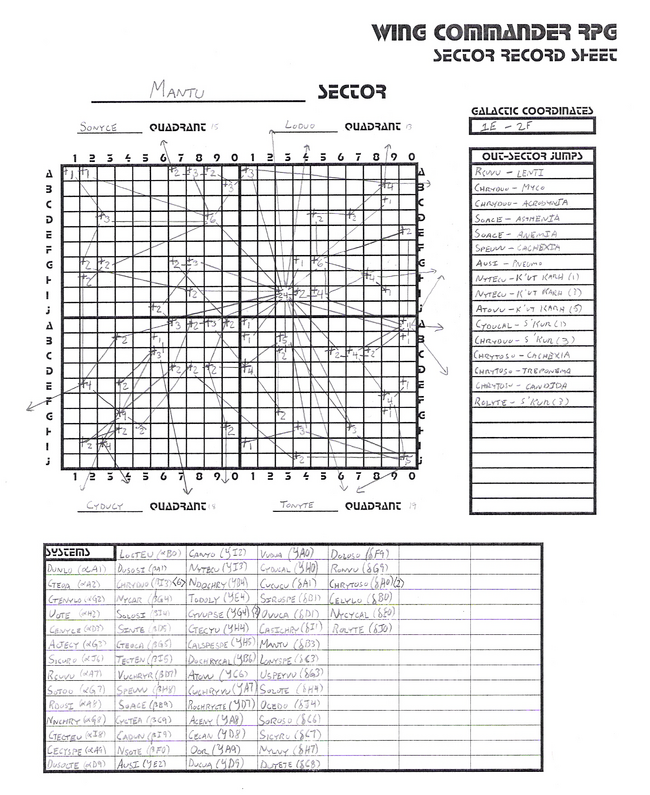
For the curious, the editors of WCRPG went ahead and created a full map for the Mantu Sector as described in the example steps of this sub-Chapter. GMs are welcome to develop this map further if they so choose or to create their own version if they so choose.
The Mantu Sector in its entirety.
NEXT: 10.2.2 Creating Nav Maps
PREVIOUS: 10.2 Creating Materials
TOP